
Why You’ll Love This Recipe
These gluten-free perogies taste just like the ones made by Grandma, with the same comforting flavors and textures. The dough is easy to handle, and you can fill them with whatever you like, from mashed potatoes to cheese, meat, or veggies. The dough itself is soft and pliable, making it simple to roll out and seal without the usual challenges that come with gluten-free baking. Plus, the recipe includes tips to help you form the perfect perogies, ensuring they turn out every time!
Ingredients
-
½ cup cream-style cottage cheese (you can use sour cream, but start with less, about ⅓ cup)
-
¼ cup milk
-
1 large egg
-
1 tablespoon oil
-
½ cup brown rice flour
-
¼ cup cornstarch
-
¼ cup tapioca starch
-
2 tablespoons potato starch
-
2 tablespoons sweet rice flour
-
1 teaspoon xanthan gum
-
½ teaspoon salt
-
Filling of your choice
-
A little bit of brown rice flour for sprinkling on the plastic wrap
(Tip: You'll find the full list of ingredients and measurements in the recipe card below.)
Directions
-
Place the cottage cheese, egg, milk, and oil in a blender and mix until completely smooth.
-
Place all the dry ingredients in a stand mixer bowl fitted with a paddle attachment. Run the mixer to combine the dry ingredients. With the mixer on low, slowly add the wet ingredients until the dough has formed. It should not be too dry or too sticky.
-
Roll a piece of dough, about the size of a golf ball, and place it on a sheet of plastic wrap.
-
Fold the plastic wrap over the dough, then roll it out into an oval shape, about 1/16" thick.
-
Remove the top layer of plastic wrap, then spoon your desired filling onto one half of the dough.
-
Wet the edges of the dough with water, using a pastry brush or your fingers, then fold the dough over to cover the filling. Seal the edges by pressing them together, working out any trapped air.
-
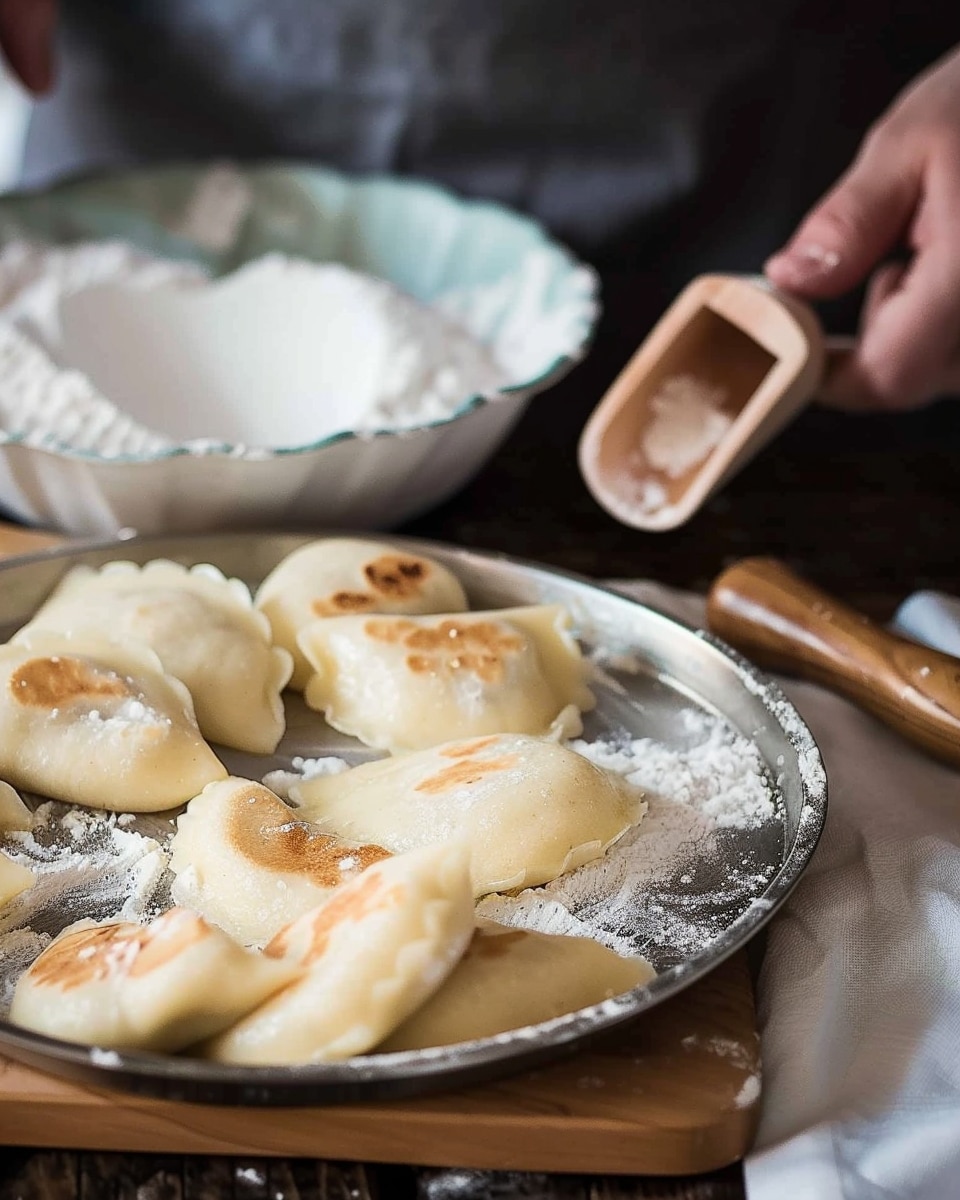
Use a sharp-edged cup or container to cut a clean, rounded edge.
-
Ensure the seam is sealed, and place the perogy on a baking pan lined with a lint-free cloth. Cover with plastic wrap and refrigerate.
-
Repeat with the remaining dough and filling.
-
To cook, bring a large pot of salted water to a rolling boil. Add a few perogies at a time to the water, stirring gently. The perogies are done when they float to the top. Let them boil for an additional minute before removing them with a slotted spoon.
-
Place cooked perogies on a parchment-lined baking sheet, making sure they are not touching. You can drizzle them with melted butter or spray them with oil to keep them from sticking.
Servings and Timing
-
Yield: 12 perogies
-
Prep Time: 45 minutes
-
Cook Time: 5 minutes
-
Total Time: 50 minutes
Variations
-
Potato & Cheese: The classic perogy filling, made with mashed potatoes and cheddar cheese.
-
Meat Filling: Ground beef or pork mixed with onions makes for a hearty perogy.
-
Sweet Fillings: Try a sweet filling like apples, cinnamon, and sugar for a dessert variation.
Storage/Reheating
-
Storage: Uncooked perogies can be frozen. Lay them out on a baking sheet and freeze them individually before transferring them to a zipper-seal bag.
-
Reheating: To reheat frozen perogies, boil them as instructed above, or fry them in a pan with a bit of butter or oil until crispy and golden.
FAQs
How do I know when my perogies are done boiling?
The perogies will float to the surface of the water when they're done. Let them cook for about a minute more once they float to ensure they’re fully heated through.
Can I use a different flour if I don't have all the flours listed?
While the specific combination of flours provides the best texture for gluten-free perogies, you can experiment with substitutes. However, the consistency of the dough might change, so proceed with caution.
How do I prevent perogies from sticking together?
To prevent sticking, ensure that your perogies don’t touch each other on the baking sheet, and you can drizzle them with a bit of melted butter or spray them with oil.
Can I make perogies ahead of time?
Yes! You can make perogies ahead of time and freeze them before boiling. They can be cooked directly from the freezer.
How do I seal the perogies so they don’t break open?
Make sure to wet the edges of the dough and press them down firmly, ensuring no air is trapped inside. Sealing them well prevents breakage while cooking.
Can I make the dough without a stand mixer?
Yes, you can mix the dough by hand. Simply combine the dry ingredients and slowly incorporate the wet ingredients until you have a smooth dough.
What are some other filling ideas for perogies?
Other fillings can include spinach and feta, mushrooms and onions, or even a sweet filling with berries or chocolate.
Can I fry the perogies after boiling them?
Yes, after boiling the perogies, you can fry them in butter or oil for a crispy, golden finish.
What should I serve with my perogies?
Perogies are traditionally served with sour cream or fried onions on top, but you can also enjoy them with a side of sautéed vegetables or a salad.
Can I double or triple the recipe?
Absolutely! The recipe can be easily scaled up to make more perogies, especially if you're preparing for a crowd.
Conclusion
Gluten-free perogies are a fantastic way to enjoy a classic comfort food without the gluten. With a tender, easy-to-work dough and endless filling possibilities, these perogies are sure to become a staple in your kitchen. Whether you’re reminiscing about family dinners or introducing them to new generations, this recipe brings joy to any meal.
Gluten-Free Perogies

Homemade gluten-free perogies filled with your choice of filling, offering a tender and perfectly sealed dough that tastes just like the traditional version.
- Prep Time: 45 minutes
- Cook Time: 5 minutes
- Total Time: 50 minutes
- Yield: 12 perogies
- Category: Main Course
- Method: Boiling
- Cuisine: Eastern European
- Diet: Gluten Free
Ingredients
½ cup cream-style cottage cheese (or ⅓ cup sour cream)
¼ cup milk
1 large egg
1 tablespoon oil
½ cup brown rice flour
¼ cup cornstarch
¼ cup tapioca starch
2 tablespoons potato starch
2 tablespoons sweet rice flour
1 teaspoon xanthan gum
½ teaspoon salt
Filling of your choice
A little bit of brown rice flour for sprinkling on the plastic wrap
Instructions
- Place the cottage cheese, egg, milk, and oil in a blender and mix until completely smooth.
- Place all the dry ingredients in a stand mixer bowl fitted with a paddle attachment. Run the mixer to combine the dry ingredients.
- With the mixer on low, slowly add the wet ingredients until the dough has formed. It should not be too dry or too sticky.
- Roll a piece of dough, about the size of a golf ball, and place it on a sheet of plastic wrap.
- Fold the plastic wrap over the dough, then roll it out into an oval shape, about 1/16" thick.
- Remove the top layer of plastic wrap, then spoon your desired filling onto one half of the dough.
- Wet the edges of the dough with water, using a pastry brush or your fingers, then fold the dough over to cover the filling. Seal the edges by pressing them together, working out any trapped air.
- Use a sharp-edged cup or container to cut a clean, rounded edge.
- Ensure the seam is sealed, and place the perogy on a baking pan lined with a lint-free cloth. Cover with plastic wrap and refrigerate.
- Repeat with the remaining dough and filling.
- To cook, bring a large pot of salted water to a rolling boil. Add a few perogies at a time to the water, stirring gently. The perogies are done when they float to the top. Let them boil for an additional minute before removing them with a slotted spoon.
- Place cooked perogies on a parchment-lined baking sheet, making sure they are not touching. You can drizzle them with melted butter or spray them with oil to keep them from sticking.
Notes
- You can freeze uncooked perogies. Lay them out on a baking sheet and freeze them individually before transferring them to a zipper-seal bag.
- To reheat frozen perogies, boil them or fry them in butter or oil until crispy and golden.
- If you don't have all the flours listed, you can experiment with substitutes, but the texture might change.
- Ensure perogies don’t touch each other on the baking sheet to prevent sticking.
- Feel free to try different fillings such as potato & cheese, spinach & feta, or even sweet fillings like apples and cinnamon.
- You can double or triple the recipe to make more perogies.
Nutrition
- Serving Size: 1 perogy
- Calories: 120
- Sugar: 1g
- Sodium: 150mg
- Fat: 3g
- Saturated Fat: 0.5g
- Unsaturated Fat: 2g
- Trans Fat: 0g
- Carbohydrates: 18g
- Fiber: 1g
- Protein: 3g
- Cholesterol: 20mg


Leave a Reply