
Why You’ll Love This Recipe
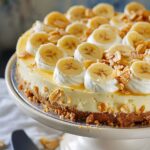
This Banana Pudding Cheesecake brings the best of both worlds: the smooth, creamy texture of cheesecake paired with the sweet, comforting flavor of banana pudding. The vanilla wafer crust provides the perfect crunch to contrast the luscious layers of banana slices, rich cheesecake, and homemade pudding. Plus, it's no-bake, which means it’s easy to prepare and perfect for warm weather or whenever you’re craving something delicious without turning on the oven. It's a crowd-pleaser that looks as stunning as it tastes, and it’s great for any special occasion or simply a weekend treat!

Ingredients
Crust
-
11 ounces vanilla wafers
-
8 tablespoons unsalted butter, melted
Pudding
-
⅓ cup granulated sugar
-
2 tablespoons all-purpose flour
-
⅛ teaspoon fine sea salt
-
1 ½ cups heavy whipping cream
-
½ teaspoon banana extract or vanilla extract
-
2 large egg yolks, room temperature, lightly beaten
Cheesecake
-
16 ounces cream cheese, softened, full fat, brick style
-
½ cup granulated sugar
-
2 tablespoons heavy whipping cream
-
1 teaspoon vanilla extract
Whipped Cream Topping
-
2 cups heavy whipping cream
-
1 ½ cups powdered sugar
Garnish (Optional)
-
Banana chips
-
¼ cup vanilla wafers, crushed
-
2 whole bananas, sliced
(Tip: You'll find the full list of ingredients and measurements in the recipe card below.)
Directions
Crust:
-
Lightly spray a 9-inch springform pan with cooking spray.
-
In a food processor, pulse the vanilla wafers into fine crumbs. Alternatively, crush them in a ziplock bag using a rolling pin.
-
Combine the crushed wafers with the melted butter in a medium bowl, mixing until the butter is fully incorporated.
-
Press the crumb mixture into the bottom and slightly up the sides of the prepared pan to form a thick crust.
-
Refrigerate the crust for at least 30 minutes to set.
Pudding:
-
In a medium-size bowl, whisk together sugar, flour, and salt.
-
Add half a cup of heavy whipping cream and whisk until smooth. Then add the remaining heavy whipping cream and the banana or vanilla extract, continuing to whisk until well combined.
-
Transfer the mixture to a saucepan and cook over medium-low heat, whisking continuously. After about 5 minutes, when the mixture is warm but not boiling, add a small portion (¼ cup) of the cream mixture to the lightly beaten eggs to temper them, whisking vigorously.
-
Slowly pour the egg mixture back into the saucepan and continue whisking. Once the pudding thickens and begins to bubble, remove it from the heat.
-
Cover the pudding with plastic wrap, ensuring the wrap is in direct contact with the surface. Poke holes in the wrap with a toothpick to let steam escape.
-
Let the pudding cool for 30 minutes at room temperature before transferring it to the refrigerator to chill for 2 more hours.
Cheesecake:
-
Beat softened cream cheese on medium-high speed for about 3 minutes until light and fluffy.
-
Slowly add sugar and continue beating until smooth.
-
Add the heavy whipping cream and vanilla extract, beating until the mixture is creamy.
-
Pour the cheesecake filling into the chilled crust and refrigerate for 2 hours.
Whipped Cream Topping:
-
Chill a mixing bowl and whisk attachment in the freezer for 5-10 minutes.
-
Pour the heavy whipping cream into the bowl and beat on medium-high speed until it begins to thicken.
-
Gradually add powdered sugar and continue beating until stiff peaks form.
Assembly:
-
Slice the bananas ¼-inch thick and arrange them on top of the chilled cheesecake.
-
Carefully spread the cooled pudding over the bananas using an offset spatula.
-
Add the whipped cream on top, reserving about 1 ½ cups to pipe along the border of the cake.
-
Garnish with crushed vanilla wafers and banana chips if desired.
-
Refrigerate for an additional 2 to 4 hours to allow the cheesecake to set properly.
Servings and Timing
-
Servings: 12 servings
-
Prep Time: 45 minutes
-
Chill Time: 7 hours
-
Total Time: 7 hours 45 minutes
Storage/Reheating
This cheesecake must be stored in the refrigerator until ready to serve. Leftovers can be kept in an airtight container for up to 3 days. Due to its no-bake nature, it’s best served chilled, and there’s no need to reheat it. Simply pull it out of the fridge, slice, and enjoy!
FAQs
1. Can I use store-bought pudding instead of homemade?
Yes! You can substitute store-bought banana or vanilla pudding for the homemade version. Instant pudding works as a time-saving alternative.
2. Do I have to use a springform pan?
Using a springform pan is recommended for easy removal, especially if you plan on serving the cheesecake on a cake stand. However, a 9-inch pie dish or square baking dish will also work.
3. How can I prevent the bananas from turning brown?
The cheesecake and pudding layers help protect the bananas from browning. If you're concerned, you can toss the banana slices in a bit of lemon juice or orange juice before layering them on the cheesecake.
4. Can I make this cheesecake ahead of time?
Yes! This cheesecake is perfect for making ahead. You can prepare it a day or two in advance and let it chill in the fridge until you're ready to serve.
5. Is there an alternative to banana extract?
You can use vanilla extract as a substitute for banana extract if you prefer, though banana extract enhances the banana flavor in the pudding.
6. How long should I chill the cheesecake?
Chill the cheesecake for at least 7 hours total—2 hours after adding the cheesecake layer, and an additional 2 to 4 hours after assembling the final layers.
7. Can I make this recipe gluten-free?
To make this recipe gluten-free, use gluten-free vanilla wafers for the crust. Ensure that the other ingredients, like the pudding mix or heavy cream, are gluten-free as well.
8. What can I use as a garnish?
You can garnish with banana chips, crushed vanilla wafers, or even extra banana slices. For extra crunch, toasted coconut flakes also make a great topping.
9. Can I freeze this cheesecake?
Yes, you can freeze the cheesecake. For best results, wrap it tightly in plastic wrap and foil, and store it in the freezer for up to 2 months. Thaw it in the fridge overnight before serving.
10. How can I make the pudding thicker?
If your pudding isn’t thickening as expected, make sure you’re cooking it over low to medium heat and stirring consistently. If needed, you can add a little cornstarch mixed with cold water to help it thicken faster.
Conclusion
This Banana Pudding Cheesecake is a delightful dessert that combines the rich flavors of banana pudding with the smoothness of cheesecake. It's no-bake, easy to prepare, and guaranteed to impress at any gathering. With its creamy texture, delicious layers, and beautiful presentation, it's a must-try for banana pudding lovers and cheesecake enthusiasts alike!
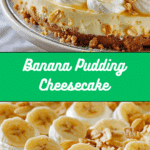
Banana Pudding Cheesecake
5 Stars 4 Stars 3 Stars 2 Stars 1 Star
No reviews
This no-bake Banana Pudding Cheesecake combines the creamy texture of cheesecake with the comforting flavors of banana pudding, all topped with whipped cream and garnished with banana chips and vanilla wafers. It's an indulgent, crowd-pleasing dessert perfect for any occasion.
- Author: Janet
- Prep Time: 45 minutes
- Cook Time: None
- Total Time: 7 hours 45 minutes
- Yield: 12 servings
- Category: Dessert
- Method: No-bake
- Cuisine: American
- Diet: Vegetarian
Ingredients
11 ounces vanilla wafers
8 tablespoons unsalted butter, melted
⅓ cup granulated sugar
2 tablespoons all-purpose flour
⅛ teaspoon fine sea salt
1 ½ cups heavy whipping cream
½ teaspoon banana extract or vanilla extract
2 large egg yolks, room temperature, lightly beaten
16 ounces cream cheese, softened, full fat, brick style
½ cup granulated sugar
2 tablespoons heavy whipping cream
1 teaspoon vanilla extract
2 cups heavy whipping cream (for topping)
1 ½ cups powdered sugar
Banana chips (optional, for garnish)
¼ cup vanilla wafers, crushed (for garnish)
2 whole bananas, sliced
Instructions
- Lightly spray a 9-inch springform pan with cooking spray.
- In a food processor, pulse the vanilla wafers into fine crumbs, then mix with the melted butter.
- Press the crumb mixture into the bottom and sides of the pan to form a thick crust. Refrigerate for at least 30 minutes to set.
- Whisk together sugar, flour, and salt in a medium bowl. Add half a cup of heavy whipping cream and whisk until smooth, then add the remaining cream and banana extract. Whisk until well combined.
- Cook the mixture over medium-low heat, whisking continuously, until it begins to bubble and thicken. Remove from heat and temper the egg yolks with a small amount of the mixture before adding them back into the pan. Cook until thickened and bubbly. Cover with plastic wrap and cool for 30 minutes, then chill in the refrigerator for 2 hours.
- Beat softened cream cheese on medium-high speed for 3 minutes until fluffy. Add sugar and continue beating until smooth, then add whipping cream and vanilla extract. Beat until creamy.
- Pour the cheesecake filling into the chilled crust and refrigerate for 2 hours.
- Chill a mixing bowl and whisk attachment. Beat the heavy cream until it thickens, then gradually add powdered sugar and beat until stiff peaks form.
- Slice the bananas and arrange them on top of the cheesecake. Spread the cooled pudding over the bananas, then top with whipped cream.
- Garnish with crushed vanilla wafers and banana chips, if desired. Refrigerate for 2 to 4 more hours to set.
Notes
- This dessert must be refrigerated for several hours to allow the layers to set properly.
- To prevent bananas from browning, toss slices in a little lemon or orange juice before layering.
- Use a springform pan for easy removal, though other pans can also work.
- Store leftovers in an airtight container in the refrigerator for up to 3 days.
- This cheesecake can be made ahead and stored in the fridge for up to 2 days before serving.
Nutrition
- Serving Size: 1 slice
- Calories: 400
- Sugar: 28g
- Sodium: 160mg
- Fat: 28g
- Saturated Fat: 16g
- Unsaturated Fat: 8g
- Trans Fat: 0g
- Carbohydrates: 35g
- Fiber: 1g
- Protein: 4g
- Cholesterol: 75mg

Leave a Reply