
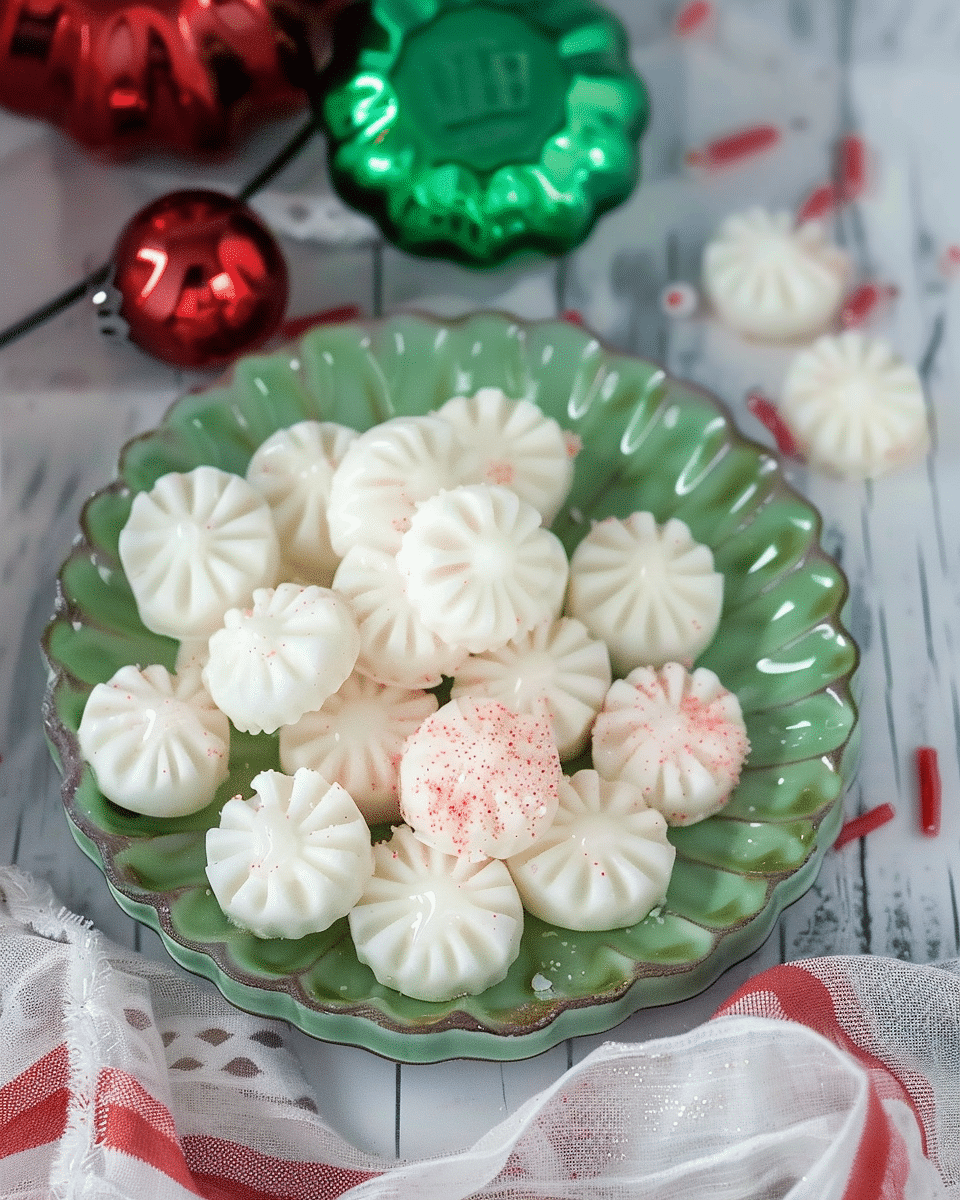
Why You’ll Love This Recipe
These butter mints are incredibly simple to make with just a handful of ingredients. There’s no baking involved, and the stand mixer does most of the work for you. The texture is smooth and creamy, with a refreshing mint flavor that isn’t overpowering.
They’re also wonderfully customizable. You can tint them to match any holiday or celebration theme, shape them however you like, and even adjust the mint flavor to your preference. Plus, they store beautifully, making them a great make-ahead treat.
Ingredients
(Tip: You'll find the full list of ingredients and measurements in the recipe card below.)
8 oz cream cheese, softened
¼ cup unsalted butter, softened
2 teaspoons mint extract
5 cups powdered sugar, plus more for sprinkling
Green food coloring
Red food coloring
Directions
-
Line a cutting board or sheet pan with parchment paper, making sure it will fit in your refrigerator. Lightly dust the surface with powdered sugar and set aside.
-
In the bowl of a stand mixer, combine the softened cream cheese, butter, and mint extract. Cream together until smooth and well blended.
-
Add one cup of powdered sugar and mix on low speed until combined.
-
Continue adding the powdered sugar one cup at a time, mixing well between each addition. Scrape down the sides of the bowl as needed. Mix until smooth and fully incorporated.
-
Divide the mixture evenly between three bowls.
-
Leave one portion white. Tint one bowl green and another red, mixing until the color is evenly distributed.
-
Cover each bowl with plastic wrap and chill for about 1 hour, or until the mixture is firm enough to handle.
-
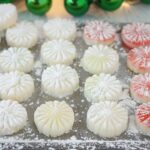
Once firm, scoop out a heaping teaspoon of mixture and roll it into a ball. Place it on the prepared parchment-lined pan.
-
If the mixture becomes sticky, lightly dust your hands with powdered sugar to make rolling easier.
-
After shaping all the mints, gently press each ball with a fork to flatten into a disc. Lightly dust the fork with powdered sugar to prevent sticking.
-
Return the pan to the refrigerator and chill for an additional 2 to 4 hours, or until fully hardened.
Servings and timing
Prep Time: 10 minutes
Chill Time: 3 to 5 hours
Total Time: Approximately 4 hours 10 minutes
Servings: 36 servings
Each serving typically includes 2 to 3 small mints, depending on size.
Variations
Chocolate Dipped: Once fully chilled, dip the mints halfway into melted chocolate and allow them to set.
Pastel Colors: Use soft pastel shades for spring gatherings or baby showers.
Different Extracts: Substitute peppermint extract for a stronger mint flavor, or try almond or vanilla extract for a different twist.
Shaped Mints: Instead of pressing with a fork, roll the dough into ropes and cut into small pillow shapes.
Storage/Reheating
Store butter mints in an airtight container in the refrigerator for up to 2 weeks. Place parchment paper between layers to prevent sticking.
For longer storage, freeze them in an airtight container for up to 2 months. Thaw in the refrigerator before serving.
These mints are best served chilled or slightly cool. Reheating is not recommended, as they are meant to be enjoyed firm and creamy.
FAQs
Why is my mint mixture too sticky to roll?
If the mixture is sticky, it may need more chilling time. You can also lightly dust your hands with powdered sugar to make shaping easier.
Can I make these without a stand mixer?
Yes, you can use a hand mixer or mix by hand, though it will require more effort to fully incorporate the powdered sugar.
Can I use peppermint extract instead of mint extract?
Yes, but peppermint extract has a stronger flavor. Start with a smaller amount and adjust to taste.
How long do butter mints need to chill?
They should chill for about 1 hour before shaping and an additional 2 to 4 hours after shaping to fully firm up.
Can I make these ahead of time?
Yes, they are perfect for making ahead. Store them in the refrigerator until ready to serve.
Why are my mints too soft?
Too little powdered sugar or insufficient chilling time can cause softness. Make sure to measure accurately and chill thoroughly.
Can I use salted butter?
Unsalted butter is preferred to control the flavor, but salted butter can be used if you reduce any additional salt in the recipe.
Do these need to stay refrigerated?
Yes, because they contain cream cheese, they should be stored in the refrigerator.
Can I change the colors?
Absolutely. Use any gel or liquid food coloring to match your theme or occasion.
Can I double this recipe?
Yes, this recipe doubles well. Just make sure your mixing bowl is large enough to handle the increased volume.
Conclusion
Old Fashioned Butter Mints are a timeless treat that combines simplicity with elegance. With their creamy texture, refreshing mint flavor, and customizable colors, they’re a delightful addition to any celebration. Easy to prepare and perfect for making ahead, these homemade mints are sure to become a cherished favorite in your recipe collection.
Old Fashioned Butter Mints
5 Stars 4 Stars 3 Stars 2 Stars 1 Star
No reviews
Old Fashioned Butter Mints are soft, creamy, melt-in-your-mouth candies with a delicate mint flavor. Perfect for holidays, weddings, baby showers, or special gatherings, these no-bake treats are simple to prepare and beautifully customizable.
- Author: Janet
- Prep Time: 10 minutes
- Cook Time: 0 minutes
- Total Time: 4 hours 10 minutes
- Yield: 36 servings
- Category: Dessert
- Method: No-Bake
- Cuisine: American
- Diet: Vegetarian
Ingredients
8 oz cream cheese, softened
¼ cup unsalted butter, softened
2 teaspoons mint extract
5 cups powdered sugar, plus more for sprinkling
Green food coloring
Red food coloring
Instructions
- Line a cutting board or sheet pan with parchment paper and lightly dust with powdered sugar.
- In a stand mixer bowl, cream together the softened cream cheese, butter, and mint extract until smooth.
- Add 1 cup of powdered sugar and mix on low speed until combined.
- Continue adding powdered sugar one cup at a time, mixing well and scraping down the sides as needed until smooth.
- Divide the mixture evenly into three bowls.
- Leave one portion white, tint one green, and tint one red. Mix until colors are evenly distributed.
- Cover and chill for 1 hour or until firm enough to handle.
- Scoop a heaping teaspoon of mixture and roll into balls. Place on prepared pan.
- Lightly dust hands with powdered sugar if mixture becomes sticky.
- Press each ball gently with a fork to flatten into discs.
- Refrigerate for an additional 2 to 4 hours until fully hardened.
Notes
- Store in an airtight container in the refrigerator for up to 2 weeks.
- Place parchment paper between layers to prevent sticking.
- Freeze for up to 2 months and thaw in the refrigerator before serving.
- If mixture is too sticky, chill longer or dust hands with powdered sugar.
- Peppermint extract can be substituted but use slightly less as it is stronger.
- These mints must be refrigerated due to the cream cheese content.
Nutrition
- Serving Size: 2-3 mints
- Calories: 100 kcal
- Sugar: 15 g
- Sodium: 50 mg
- Fat: 5 g
- Saturated Fat: 3 g
- Unsaturated Fat: 2 g
- Trans Fat: 0 g
- Carbohydrates: 18 g
- Fiber: 0 g
- Protein: 1 g
- Cholesterol: 20 mg

Leave a Reply