
Why You’ll Love This Recipe
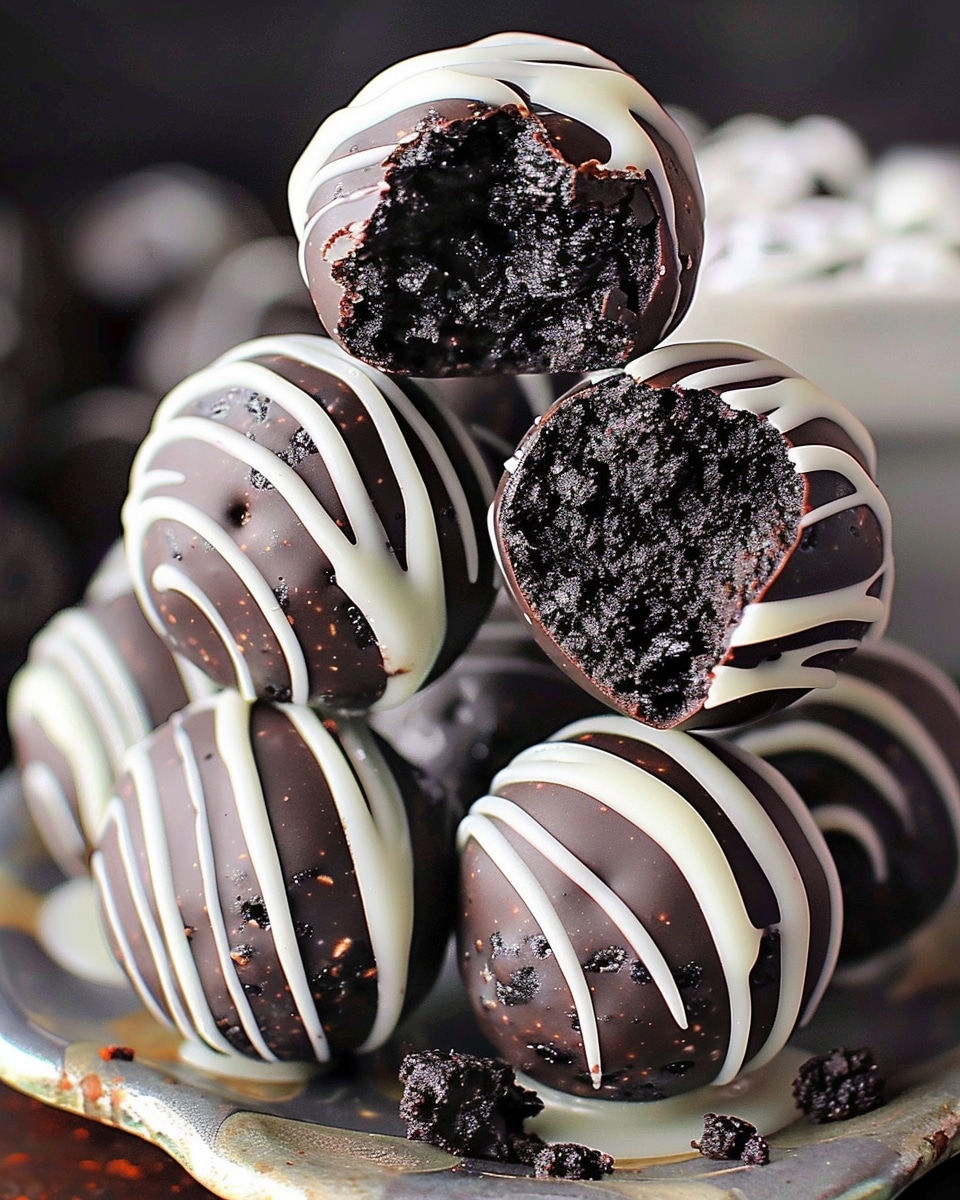
Oreo balls are the ultimate no-bake treat, and they’re as easy to make as they are delicious! The rich combination of Oreos and cream cheese creates a creamy center that’s perfectly balanced by the crunchy dark chocolate coating. Whether you want a sweet snack or a gift for someone special, these truffles are sure to impress. Plus, the option to decorate with white chocolate adds a fun, customizable touch!
Ingredients
(Tip: You'll find the full list of ingredients and measurements in the recipe card below.)
-
28 Oreos (2 small packets, regular, not double stuffed)
-
⅔ cup (150 g) cream cheese, room temperature, firm block type
-
2 cups (340 g) dark chocolate melts
-
⅓ cup (56 g) white chocolate melts (optional for decorating)
Directions
-
Prepare the Tray: Line a tray with baking paper and set it aside. Make sure the tray will fit into your freezer.
-
Crush the Oreos: Add the Oreos into a food processor and process them until they turn into fine crumbs. If you don't have a food processor, place the Oreos in a sealable sandwich bag and crush them with a rolling pin.
-
Mix the Filling: Add the cream cheese to the crushed Oreos and mix using a hand mixer until well combined. Be careful not to overmix, as it can make the mixture too soft.
-
Form the Balls: Using heaping tablespoons of the mixture, shape the dough into 12 large balls (or more if you want smaller truffles). Roll them into smooth balls using the palms of your hands. If the mixture is too soft, chill it in the freezer for 10-15 minutes before rolling.
-
Freeze: Place the formed balls onto the lined tray and freeze for 15 minutes.
-
Melt the Dark Chocolate: While the Oreo balls are chilling, melt the dark chocolate in the microwave. Heat in 20-second bursts, stirring in between until fully melted.
-
Coat the Oreo Balls: Dip the Oreo balls into the melted dark chocolate using two forks. Allow any excess chocolate to drip off before placing them back onto the tray.
-
Decorate with White Chocolate: Melt the white chocolate in the microwave using the same method. Transfer it to a piping bag and drizzle over the coated Oreo balls in a zig-zag pattern.
-
Let the Chocolate Set: Allow the chocolate coating to set completely. For a quicker process, place the tray in the freezer for 5-10 minutes.
Servings and Timing
-
Servings: 12 large Oreo balls (or more if you make smaller ones)
-
Prep time: 30 minutes
-
Total time: 30 minutes
Variations
-
Flavored Coatings: Instead of dark chocolate, you can use milk chocolate, white chocolate, or even flavored melts such as mint or caramel.
-
Add Toppings: You can roll your Oreo balls in crushed nuts, sprinkles, or coconut flakes before the chocolate sets for added texture and flavor.
-
Colorful Decoration: Use colored chocolate melts for a fun and festive touch, perfect for holidays or special occasions.
Storage/Reheating
-
Storage: Store the Oreo balls in an airtight container in the fridge for up to a week. They can also be frozen for up to 3 months.
-
Reheating: These truffles don’t require reheating. Simply thaw them at room temperature for 15-20 minutes before serving if frozen.
FAQs
How do I keep the Oreo balls from getting too soft?
To keep the balls firm, use a block-style cream cheese, not the spreadable variety. If the mixture becomes too soft, chill the tray in the freezer for 10-15 minutes before rolling.
Can I use milk chocolate instead of dark chocolate?
Yes, milk chocolate can be used as a substitute for dark chocolate. Just ensure it is well melted and, if necessary, tempered to avoid melting in your hands.
How do I prevent the Oreo balls from sticking to my hands?
If the mixture is too sticky, try chilling the dough for a few minutes before rolling the balls. You can also dust your hands lightly with cocoa powder or powdered sugar to reduce stickiness.
Can I use a rolling pin if I don’t have a food processor?
Yes, you can place the Oreos in a sandwich bag and crush them with a rolling pin until they resemble fine crumbs.
Can I make smaller Oreo balls?
Yes, simply divide the mixture into smaller portions. You will get more Oreo balls, but be sure to adjust the amount of chocolate you use to coat them.
Do I need to temper the chocolate?
If you use regular chocolate (not melts), tempering is essential to ensure the coating doesn’t melt in your hands. Chocolate melts, however, don’t require tempering.
Can I use cream cheese spread instead of block cream cheese?
It’s not recommended to use spreadable cream cheese as it may make the mixture too soft. If you do use it, reduce the amount of cream cheese to avoid a very sweet truffle.
Can I add other ingredients to the mixture?
Yes, you can get creative by adding other ingredients like peanut butter, chopped nuts, or even mini chocolate chips to the mixture.
How long should I freeze the Oreo balls?
Freeze the Oreo balls for about 15 minutes to firm them up before dipping in chocolate. If you need to speed up the chocolate setting process, place them back in the freezer for 5-10 minutes after coating.
Are these Oreo balls gluten-free?
Yes, as long as you use gluten-free Oreos, this recipe can be made gluten-free.
Conclusion
No Bake Oreo Balls are a delightful and simple treat that everyone will love. With just a few ingredients and minimal prep time, you can create a show-stopping dessert that’s perfect for any occasion. Whether you make them large or small, decorated or simple, these Oreo truffles are sure to satisfy your sweet tooth!
No Bake Oreo Balls / Truffles Recipe

These No Bake Oreo Balls are a quick and delicious treat with a soft, mousse-like filling and a crunchy chocolate exterior. Perfect for parties, holiday gatherings, or a sweet snack, they are easy to make and customizable with white chocolate decoration.
- Prep Time: 30 minutes
- Cook Time: 0 minutes
- Total Time: 30 minutes
- Yield: 12 large Oreo balls (or more if smaller)
- Category: Dessert
- Method: No-Bake
- Cuisine: American
- Diet: Vegetarian
Ingredients
28 Oreos (2 small packets, regular, not double stuffed)
⅔ cup (150 g) cream cheese, room temperature, firm block type
2 cups (340 g) dark chocolate melts
⅓ cup (56 g) white chocolate melts (optional for decorating)
Instructions
- Prepare the Tray: Line a tray with baking paper and set it aside. Make sure the tray will fit into your freezer.
- Crush the Oreos: Add the Oreos into a food processor and process them until they turn into fine crumbs. If you don't have a food processor, place the Oreos in a sealable sandwich bag and crush them with a rolling pin.
- Mix the Filling: Add the cream cheese to the crushed Oreos and mix using a hand mixer until well combined. Be careful not to overmix, as it can make the mixture too soft.
- Form the Balls: Using heaping tablespoons of the mixture, shape the dough into 12 large balls (or more if you want smaller truffles). Roll them into smooth balls using the palms of your hands. If the mixture is too soft, chill it in the freezer for 10-15 minutes before rolling.
- Freeze: Place the formed balls onto the lined tray and freeze for 15 minutes.
- Melt the Dark Chocolate: While the Oreo balls are chilling, melt the dark chocolate in the microwave. Heat in 20-second bursts, stirring in between until fully melted.
- Coat the Oreo Balls: Dip the Oreo balls into the melted dark chocolate using two forks. Allow any excess chocolate to drip off before placing them back onto the tray.
- Decorate with White Chocolate: Melt the white chocolate in the microwave using the same method. Transfer it to a piping bag and drizzle over the coated Oreo balls in a zig-zag pattern.
- Let the Chocolate Set: Allow the chocolate coating to set completely. For a quicker process, place the tray in the freezer for 5-10 minutes.
Notes
- Store in an airtight container in the fridge for up to a week or freeze for up to 3 months.
- To prevent the Oreo balls from getting too soft, use block-style cream cheese.
- If you prefer milk chocolate, it can be substituted for dark chocolate.
- Roll the Oreo balls in toppings like crushed nuts, sprinkles, or coconut flakes for added texture and flavor.
- Use colored chocolate melts for a festive touch.
Nutrition
- Serving Size: 1 Oreo ball
- Calories: 160
- Sugar: 13g
- Sodium: 50mg
- Fat: 9g
- Saturated Fat: 5g
- Unsaturated Fat: 3g
- Trans Fat: 0g
- Carbohydrates: 19g
- Fiber: 1g
- Protein: 2g
- Cholesterol: 10mg


Leave a Reply