Oreo Cheesecake Brownies Recipe
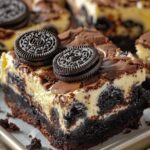
Oreo Cheesecake Brownies are perfect for those who can't decide between chocolatey brownies or creamy cheesecake. The rich, fudgy brownie layer gives way to a smooth, velvety cheesecake layer that’s slightly tangy. The Oreo cookies add a fun, crunchy texture that elevates the flavor even further. These brownies are easy to make, satisfying to eat, and always a crowd-pleaser. Whether you're hosting a party, attending a potluck, or just craving something sweet, these brownies will definitely impress.
- Prep Time: 15 minutes
- Cook Time: 30–35 minutes
- Total Time: 1 hour 45 minutes (including cooling)
- Yield: 16 squares
- Category: Dessert
- Method: Baking
- Cuisine: American
- Diet: Vegetarian
Ingredients
For the Brownie Layer:
1/2 cup unsalted butter, melted
1 cup granulated sugar
2 large eggs
1 tsp vanilla extract
1/2 cup cocoa powder
1/2 cup all-purpose flour
1/4 tsp salt
For the Cheesecake Layer:
8 oz cream cheese, softened
1/4 cup granulated sugar
1 large egg
1/2 tsp vanilla extract
For Assembly:
12 Oreo cookies (whole or crushed)
Instructions
-
Prepare the Brownie Batter:
Preheat the oven to 350°F (175°C) and line an 8x8-inch baking pan with parchment paper. In a mixing bowl, whisk together the melted butter and sugar until smooth. Add the eggs and vanilla extract, mixing well. Sift in the cocoa powder, flour, and salt, stirring until everything is combined. Set the brownie batter aside. -
Make the Cheesecake Layer:
In another bowl, beat the softened cream cheese and sugar together until smooth and creamy. Add the egg and vanilla extract, mixing until fully incorporated. -
Assemble the Layers:
Pour half of the brownie batter into the prepared pan and spread it evenly. Add the cheesecake mixture on top, spreading it gently to cover the brownie layer. Spoon the remaining brownie batter on top of the cheesecake layer and gently swirl it with a knife to create a marbled effect. Place the Oreo cookies on top, pressing them slightly into the batter. -
Bake and Cool:
Bake the brownies for 30–35 minutes, or until the center is just set. Allow the brownies to cool completely in the pan before slicing. -
Serve and Savor:
Once cooled, cut into squares and enjoy these rich, creamy, and chocolatey bars.
Notes
Can be made gluten-free, dairy-free, or with chocolate chips. Store at room temperature or refrigerate.
Find it online: https://recipesbyjanet.com/oreo-cheesecake-brownies-recipe/
